ScubaSteve
Active member
- Joined
- May 8, 2010
- Messages
- 3,749
How to change rear brake shoes.
Tools needed.
30mm Deep Socket, preferably a hub nut socket.
Flat blade Screwdriver.
10mm Spanner.
Tub of Multipurpose Grease.
Tub of Copper Grease.
Torque Wrench capable of tightening to 235nm.
Elastic Bands (optional).
Axle Stands.
Jack.
Parts needed.
Rear brake shoe kit available from Ford for around 30 pounds. Note that they come in two sizes generally later models are the 200mm ones, early ones are 180mm, mine is a 2000 reg car and was 200mm but you will want to double check first.
Chock the front wheels and put the car into 1st gear.
Fully release the handbrake and pull up the handbrake gaiter and locate the 10mm adjuster nut on the handbrake cable. Fully slacken this to the end of the thread.
Slacken the rear wheel bolts and jack up the rear of the car place axle stands under the rear beam trailing arms.
Remove road wheels, and with a small flat head screwdriver prise off the dust caps on the center of the hubs.
Using your 30mm socket, slacken the hub nut, be careful this may be quite tight. Remove nut off the stub axle.
Pull the drum away carefully to avoid damage to the bearing, if it is being stubborn either tap the periphery of the drum, with a bit of wiggling the drum should eventually come off.
Be careful as the bearing will likely fall out the drum if tilted upside down. using your finger pull the bearing out of the drum and set aside on a clean rag or surface.
Inspect the insides of the drum lining and clean up with methylated spirits. Remove any loose brake dust particles, careful not to inhale it.
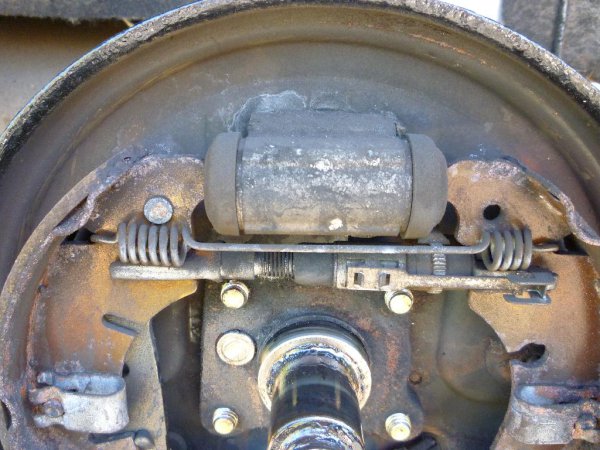
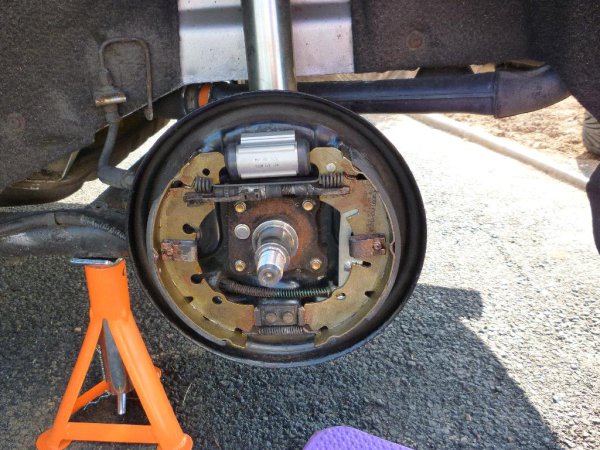
Next the fun starts, you will be faced with a setup very similar to this
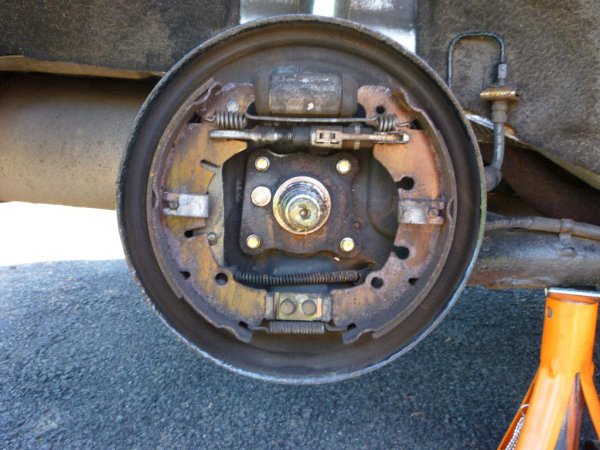
Take a similar picture to remind yourself how it all goes back together if you get stuck.
The best order I found to dismantling it all was as follows,
Start by removing the metal clips on the middle of each brake shoe, push the ends of the clips in and push them off the retaining pins. You can then recover the retaining pins by pushing them out the back of the assembley.
Scrape/clean as necessary to remove hardended brake dust.
Next starting at the bottom,
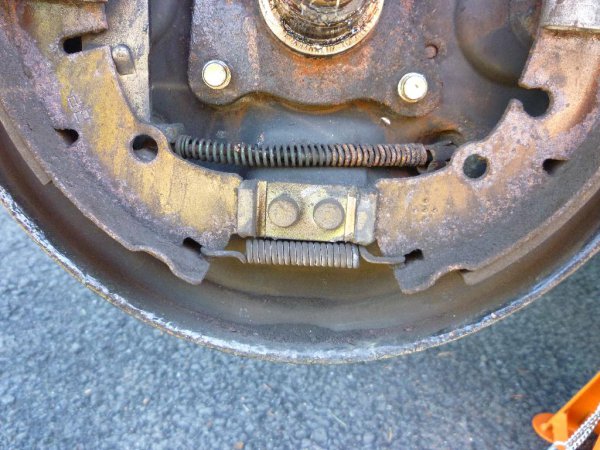
Prise away the bottom of one of the brake shoes from its holder
You will then be able to remove the bottom spring.
Move to the top and you should be able to manouvre the top pieces from the edges of the wheel cylinders.
Recover the top spring, and adjuster.
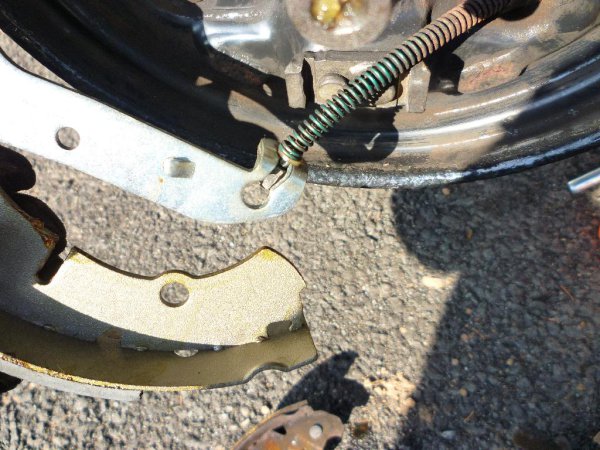
Finally twist the handbrake cable from the brake shoe arm.
You will then be able to remove everything off, and end up with something similar to this
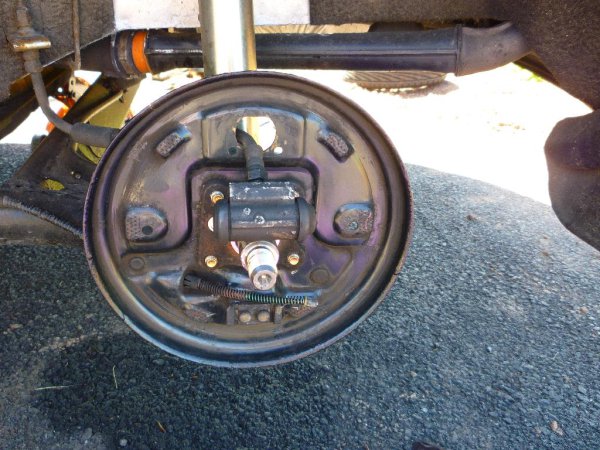
Ignore the fact my wheel cylinder is hanging off, as I was changing these at the same time, you do not need to remove your wheel cylinders like this if you are just changing brake shoes.
Apply a thin layer of copper grease to all contact points on the new brake shoes, especially the friction point of the handbrake cable swing arm.
Do not get grease on the braking material of the brake shoes itself.
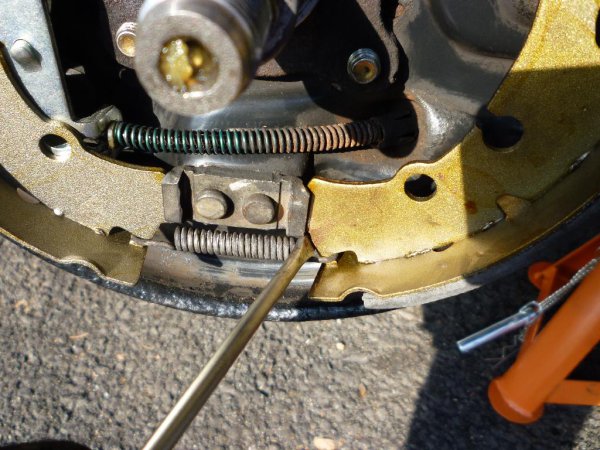
When you reassemble do it in the reverse order you took them off, i.e. locate the top of the brake shoes in the wheel cylinder, then the adjuster and top spring first, then the lower spring, then the retaining clips and pins, before refitting the adjusters, screw them in somewhat otherwise you wont get the drum back on.
Lever the lower point into position with a screwdriver.
If your wheel cylinders keep opening and getting in the way hold them shut with an elastic band or two until you have the brake shoes in position then cut them off.
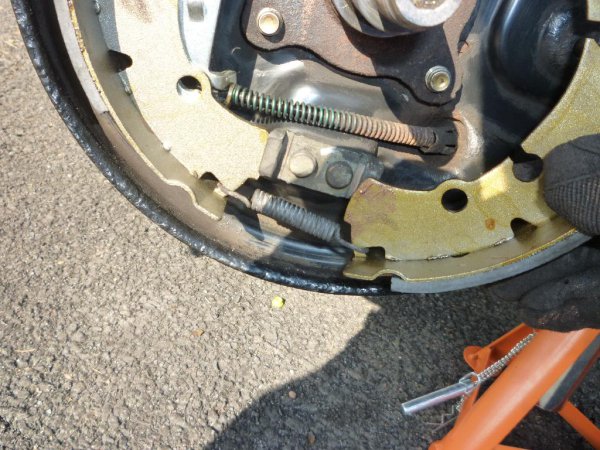
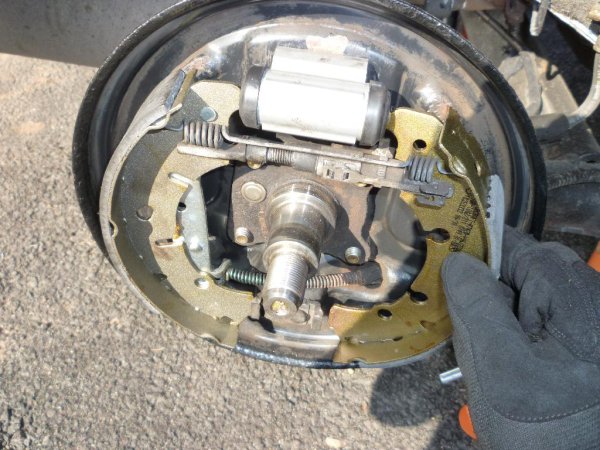
Once you have everything back in position you should be left with this.
Clean up the stub axle and apply a layer of multipurpose grease.
Apply more grease inside the center hole of the drum assembley that you removed off the car. Also apply generous amounts of grease to the wheel bearing.
Slide the drum back on the assembley, then slide the bearing back over the stub axle locating it correctly and evenly in the center of the drum.
Apply more grease to the hub nut and thread, then do up the hub nut, to the correct torque of 235nm.
Once you have carried all this out on both sides, pump the footbrake 5 or 6 times so the self adjusters adjust correctly.
Pull the handbrake up 6 clicks, then do the handbrake cable adjuster nut up to the correct torque of 4nm.
Refit the handbrake gaiter, and check the handbrake engages properly and stops the drums turning.
Refit the road wheels and lower car back down and job done!
Dont know if this needs to be a guide or not?
Tools needed.
30mm Deep Socket, preferably a hub nut socket.
Flat blade Screwdriver.
10mm Spanner.
Tub of Multipurpose Grease.
Tub of Copper Grease.
Torque Wrench capable of tightening to 235nm.
Elastic Bands (optional).
Axle Stands.
Jack.
Parts needed.
Rear brake shoe kit available from Ford for around 30 pounds. Note that they come in two sizes generally later models are the 200mm ones, early ones are 180mm, mine is a 2000 reg car and was 200mm but you will want to double check first.
Chock the front wheels and put the car into 1st gear.
Fully release the handbrake and pull up the handbrake gaiter and locate the 10mm adjuster nut on the handbrake cable. Fully slacken this to the end of the thread.
Slacken the rear wheel bolts and jack up the rear of the car place axle stands under the rear beam trailing arms.
Remove road wheels, and with a small flat head screwdriver prise off the dust caps on the center of the hubs.
Using your 30mm socket, slacken the hub nut, be careful this may be quite tight. Remove nut off the stub axle.
Pull the drum away carefully to avoid damage to the bearing, if it is being stubborn either tap the periphery of the drum, with a bit of wiggling the drum should eventually come off.
Be careful as the bearing will likely fall out the drum if tilted upside down. using your finger pull the bearing out of the drum and set aside on a clean rag or surface.
Inspect the insides of the drum lining and clean up with methylated spirits. Remove any loose brake dust particles, careful not to inhale it.
Next the fun starts, you will be faced with a setup very similar to this
Take a similar picture to remind yourself how it all goes back together if you get stuck.
The best order I found to dismantling it all was as follows,
Start by removing the metal clips on the middle of each brake shoe, push the ends of the clips in and push them off the retaining pins. You can then recover the retaining pins by pushing them out the back of the assembley.
Scrape/clean as necessary to remove hardended brake dust.
Next starting at the bottom,
Prise away the bottom of one of the brake shoes from its holder
You will then be able to remove the bottom spring.
Move to the top and you should be able to manouvre the top pieces from the edges of the wheel cylinders.
Recover the top spring, and adjuster.
Finally twist the handbrake cable from the brake shoe arm.
You will then be able to remove everything off, and end up with something similar to this
Ignore the fact my wheel cylinder is hanging off, as I was changing these at the same time, you do not need to remove your wheel cylinders like this if you are just changing brake shoes.
Apply a thin layer of copper grease to all contact points on the new brake shoes, especially the friction point of the handbrake cable swing arm.
Do not get grease on the braking material of the brake shoes itself.
When you reassemble do it in the reverse order you took them off, i.e. locate the top of the brake shoes in the wheel cylinder, then the adjuster and top spring first, then the lower spring, then the retaining clips and pins, before refitting the adjusters, screw them in somewhat otherwise you wont get the drum back on.
Lever the lower point into position with a screwdriver.
If your wheel cylinders keep opening and getting in the way hold them shut with an elastic band or two until you have the brake shoes in position then cut them off.
Once you have everything back in position you should be left with this.
Clean up the stub axle and apply a layer of multipurpose grease.
Apply more grease inside the center hole of the drum assembley that you removed off the car. Also apply generous amounts of grease to the wheel bearing.
Slide the drum back on the assembley, then slide the bearing back over the stub axle locating it correctly and evenly in the center of the drum.
Apply more grease to the hub nut and thread, then do up the hub nut, to the correct torque of 235nm.
Once you have carried all this out on both sides, pump the footbrake 5 or 6 times so the self adjusters adjust correctly.
Pull the handbrake up 6 clicks, then do the handbrake cable adjuster nut up to the correct torque of 4nm.
Refit the handbrake gaiter, and check the handbrake engages properly and stops the drums turning.
Refit the road wheels and lower car back down and job done!
Dont know if this needs to be a guide or not?

