Restoration of FRP 477

ProjectPuma

Help Support ProjectPuma:

This site may earn a commission from merchant affiliate links, including eBay, Amazon, and others.
So the next update!

To be fair, I've done very little but spent a fortune!

Firstly there was the engine refresh by Eldude, AKA, Chris Allison of Allison Automotive. What an amazing job. Engine out, cambelt change, clutch change, water pump, thermostat, virtually every oil seal known to man, a thorough clean and a service thrown in to boot.

There were a few gremlins to sort out, like the fact the inlet and inlet ports on the head being full of oil. I hope its down to a failed oil separator valve and the past owner overfilling it rather than he worst case of failing rings. It was great that it appears the 54k miles on the clock is genuine, with it looking like all the original fixings and parts had never been touched. Weirdly it looks like the inlet gasket was damaged from new too.

8AC156F6-12B6-4CBA-A166-43692A51D090_zpshp3krsvw by James Suckling, on Flickr

67A0E52E-B3A4-4F85-AD29-51EA54F5510D_zps4wylyou3 by James Suckling, on Flickr

E21DDF33-5B34-4C5C-A433-F96809D8AD60_zpsnfmc1yro by James Suckling, on Flickr

Moving onto the brakes. I think #477 seriously tested Chris' patience as they were not just ruined, they were nearly past saving with seized and snapped bolts, broken bridge pipe bolts, stripped nipples and very, very tired casings. Despite all this, the transformation is simply amazing with just fantastic attention to detail. I really wanted originality and with that hunted high and low for genuine Alcon discs but as they just don't exist anymore, went for bells and rotors. Man I'm glad I did. They look ace with the bolts holding the rotors on, and more importantly the car stops straight and on a dime now.

From this:

1C0ECD30-0A3B-4D0E-8977-AAA0F366A595_zpsx4pkihck by James Suckling, on Flickr

To this!!

88534E47-4356-4354-9348-E65B161D8AA7_zpsobhkm0co by James Suckling, on Flickr

B4F8722E-C607-4EF3-B7A8-3623B24DF212_zpsks2swlwg by James Suckling, on Flickr

Whist Chris was doing the dirty bits, I was doing the fun part, hunting for bits! A trip to Ian G at Puma Bits was brilliant with the Golf literally filled to the roof with parts including some steering wheels to refurb. Then onto Pumabuild with the help of Simon (Blue3) to help empty my wallet, walking away with the last four brand new wheels money can buy, a pair of quarters that I just had to have 'in case' and various other fantastic bits to help with the rebuild. My other half is already fully aware the holiday abroad has just been downgraded this year to pay for it all!! The boxes from fordpartsuk are also steadily coming in as they track down all sorts for me. The loft now looks like a Ford parts warehouse...

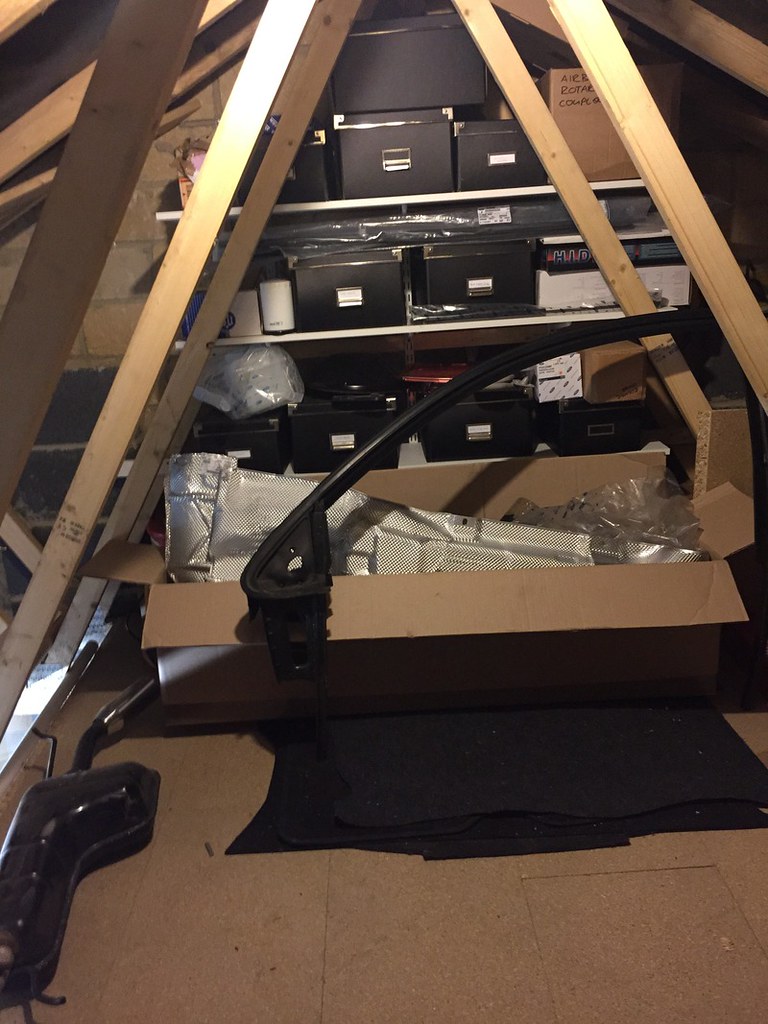
8482B6B6-235B-48A1-86E2-52E23CC364A5_zps4pkzfpnc by James Suckling, on Flickr

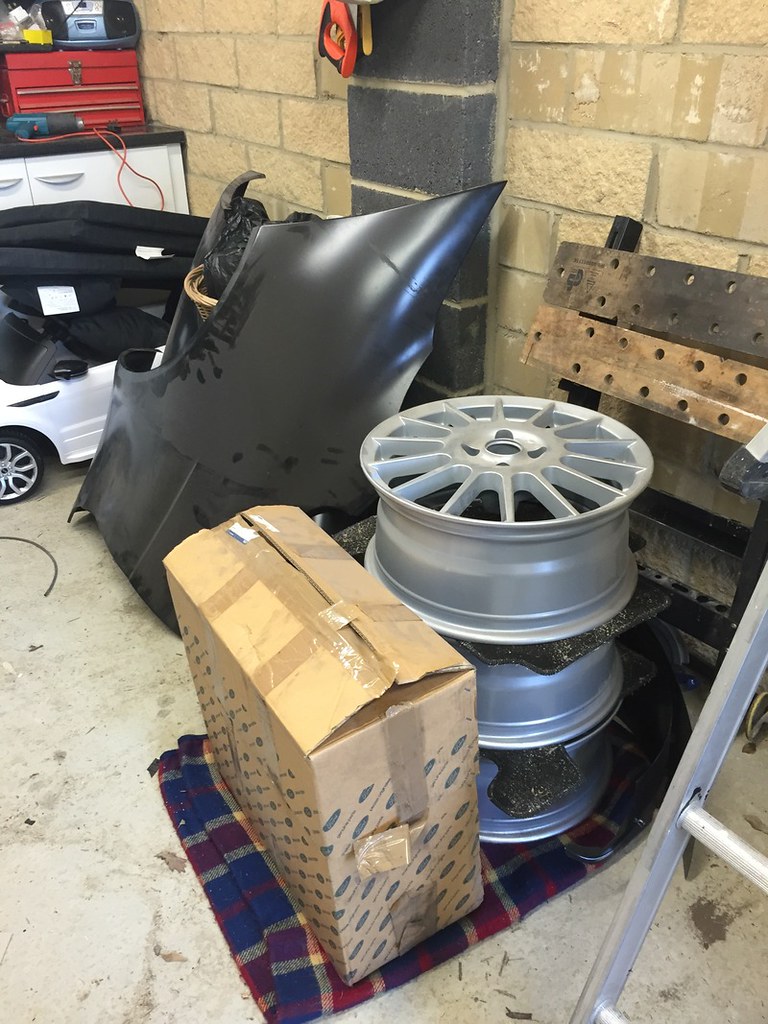
ABFFE077-0C9D-44ED-A085-839432A9A1B2_zpseqbtn4ks by James Suckling, on Flickr

Now it's mechanically sound, and the bank account is well and truly drained it's time for the hard part. The garden shed goes up in few weeks to clear out the rubbish from the garage into, then paint the garage floor. After that, it's time to jack up the car and strip down the last nut and bolt underneath and make it mint. The hard graft starts now. Well. After Ford Fair anyway!!
 
Giddy aunt wasn't what the Mrs said!!!

Yes Barry, two quarters. I hope I'll never need them!
 
It's taken way too long, but well overdue for an update on #477. Over the summer the first thing to do in order to make it semi presentable and safe was to get some good tyres on the new wheels, and what a difference it made against the new brakes. Almost looked presentable!


Then a full machine polish to kind of make it look semi loved for Ford Fair. They say the camera doesn't lie, but trust me it does!!


So then time just passed by and I just didn't get time to start work, although parts a plenty have been stocking up, including a full set of brand new suspension which I can't wait to get on.

Today I eventually got going, car up up in the air and a day off from Daddy duties!


After a good poke around, it's pretty rough under there, but no worse than any other 15 year old Puma to be fair. The worst part is the bottom of the drivers side quarter panel when it is riveted to the sills. Very frilly! I could cut up the new quarter to repair it, but it would be a waste of a whole panel so a repair section will need to be fabricated. Anyway, I'll let the pictures do the talking:


When you work on a car, it's always nice to see how the professionals at Tickford modified the ABS sensor for the FRP!


The back bumper is saveable, but with the quality of the paint on it, and a few broken sections where the last owner botched the spats and mudflaps, I thinks it's going to be more cost effective to get a new one


Triggers Broom springs to mind with this FRP, but it will be mint when it's finished.

Surprisingly, the back panel and inner arches are all pretty sound


So by the end of the day all the back brakes, shockers and hubs are off, ready to drop the beam. Next the custom stainless exhaust needs to come off as its all one piece so it has to come after the beam. That will get a clean up and the whole lot and manifold on eBay.

Brakes are going to get sent off to Bigg Red for a refurb whilst I look forward to the joy of dropping the tank (any hints welcome as its got at least a quarter of a tank in), followed by hours on my back getting it all back to clean bare metal. Well, I hope bare metal and not just holes!
 
Hi James
Are you going to do all the underneath yourself? It's Rufforth next weekend so you'll be able to stock up with wire brushes etc if you want.
If you want a hand with your tank etc just give us a ring.
Barry
 
If the pump still runs unplug the fuel cut off in the passenger footwell and put 12v to the middle pin, and run a pipe from the white plug on the fuel rail.
 
Hi James, outstanding work so far, if you can can you take a picture of the rear inner arch, im interested in how they put this together, one last thing did they rivet the rear quarter to the sills ?.anyway ill be watching this with envy, keep up the good work.Richard
 
tuonokid said:
Hi James
Are you going to do all the underneath yourself? It's Rufforth next weekend so you'll be able to stock up with wire brushes etc if you want.
If you want a hand with your tank etc just give us a ring.
Barry

Yes, all myself Barry. Thankfully there doesn't appear to be any welding or I'd be calling in some favours from a local expert in Puma welding projects........

A hand with the tank would be awesome, and Ian, you as ever are a legend! One very smelly flammable problem solved!
 
rnnicol said:
Hi James, outstanding work so far, if you can can you take a picture of the rear inner arch, im interested in how they put this together, one last thing did they rivet the rear quarter to the sills ?.anyway ill be watching this with envy, keep up the good work.Richard

Evening Richard, this thread tells you nearly all you need to know about the FRP rear arch:

http://www.projectpuma.com/viewtopic.php?f=138&t=22567" onclick="window.open(this.href);return false;

They are welded at the top, riveted at the bottom, as well as plenty of glue and filler!

Mine has gone at the bottom where they are riveted. The original quarter is still sound. It's the FRP outer that had rotted. Any pics, just shout!
 
XAF said:
When you work on a car, it's always nice to see how the professionals at Tickford modified the ABS sensor for the FRP!


In all honesty to Tickford, this is regular puma/fiesta rear ABS sensor (you can tell as it is angled). By the looks of it, it was seized (as they usually get to be) and was then being pushed out with the retaining bolt still in place (someone probably forgot about it) and then it looks like this.
FRP used straight ABS sensors from escort estate to enable usage of spacers at the rear beam. The difference is in price: angled sensors like this can be had for 20-ish GBP, whereas the straight ones tend to cost at least 4 times more....
 
To be fair, the car is 15 years old so plenty of time for someone else to have bodged it. It was the third to last FRP ever built (build number rather than manifold number), maybe they'd run out of the correct parts and thought what the hell?!! Nothing in the service history or MOT's indicating a part of failure though.

Looks as though whoever has done it cut the mounting lug off so it would fit in the space. There was nothing holding it in, no bolt or anything. Strangely, with WD40 soaked in for an hour, both sides just slid out.

I'm debating putting the working but butchered loom back in, or going for one that looks better but does the same job. Will irk me knowing it's a bodge, even if it may be an original bodge!
 
Eyup James
I'm with Wild E on this one.
If that was original ABS loom there's no way you could've got the sensors out in one piece.
I think it must have been changed at some point. I don't believe that Tickford engineers would do summat like that.
I'm looking forward to seeing this progress by the way.
Paul
 
Cheers Paul. Yeah, on reflection you and Wild E are probably right, there are defo some 'interesting' modifications that Tickfords did, but this is just too much of a hatchet job!!
 
Back
Top