Stage Car Project

ProjectPuma

Help Support ProjectPuma:

This site may earn a commission from merchant affiliate links, including eBay, Amazon, and others.
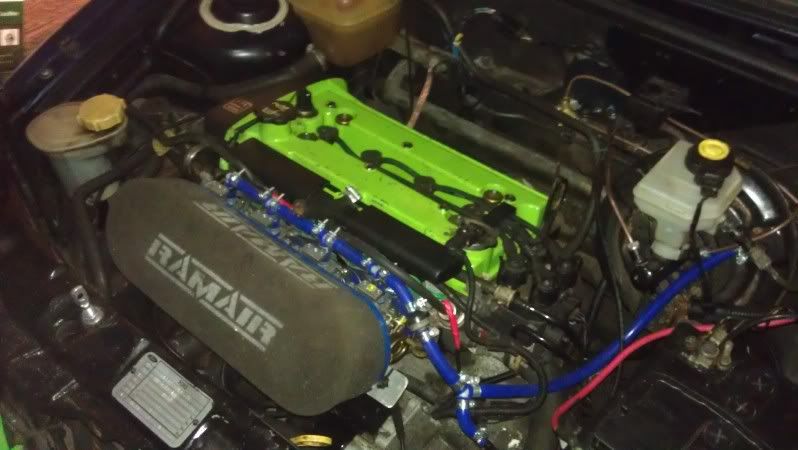
thanks for that phil - makes it alot easier especially as they seemed to be spaced correctly and near an exact fit , did you cut the intake down to a specific length or was is just guess work m8 .

Any idea what type of management system you are going to use with your throttle bodies? Omex ,megajolt?
 
I initially just cut it to the point where they where most flat but since then i have trimmed them with the dremmel and polished the insides and rounded off any edges. It needs a bit of head work too but we may be dropping a 1400 in it so it is more class competetive. We would like to be able to do the mapping ourselves and the best way will be with a megasquirt ecu.
 
Just to keep you guys updated we are currently doing the cheap jobs until I can find another job and Phil gets rid of his Audi for something cheaper.

Last weekend we fitted bonnets pins and boot springs, removed the standard bonnet catch and boot lock and also started removing the sound deadening that is stuck to the car.

A real PITA of a job but should be worth it in the end as it seems quite heavy, so far the whole boot sound proofing has been removed and the interior is being painted white.
 
I dont evny you with the sound deadening. I am currently taking mine out. Any tips on getting it out of the side panels behind the rear door cards?

Looking forward to seeing some pictures of how this is coming along.
And to steal your throttle cable connection bracket design for when I get around to putting bodies on mine.
 
That sound deadening has been left for now, we are worried that trying to remove that will result in large dents on the rear panels, may have to be some that just gets left. I'll try to get some pics up this weekend, we have a lot of cut slicks and some team dynamics pro rally wheels now too/

In fact here is a pic of the pro rallys.

207469_10150170794167472_525307471_6784475_6255459_n.jpg

222114_10150170794557472_525307471_6784477_3159335_n.jpg

221677_10150170794592472_525307471_6784479_7408900_n.jpg
 
Hey everyone,

There's been a lot going on with the Puma recently as I am now back in work. As most of the work is still in progress i'm not going to detail it now, I will get a full report with pictures once everything is complete but a brief summary is aluminium door cards, sausage filter, mudflaps, fully braided brakes lines, intercom, painting, tyres, wideband and more.

Here are a couple of videos to keep you entertained while the rest of the work is completed.

https://www.youtube.com/watch?v=JxfoQVcb5vA" onclick="window.open(this.href);return false;

https://www.youtube.com/watch?v=r46P7rKm9n4" onclick="window.open(this.href);return false;
 
Firstly, let me just say awesome work so far! Exactly the kind of approach I'll be going for (megasquirt with no previous experience etc).

I am considering quickly trying out the ITB set-up you have before my insurance runs out and I put my Puma off the road for some winter modifications.

My shopping list going from your photos:

-A rocker cover breather filter
-A spare inlet manifold (as I may need to revert back in the future)
-A set of GSXR1000 throttle bodies
-Trumpet sock air filters
-Small diameter silicone hose
-T pieces for small hose
-Cable ties for small hose
-L piece for small hose
-Large diameter silicone hose
-Clips for large hose
-Custom throttle cable bracket

Could you help me out with the following?...

1) Which year GSXR1000 are your throttle bodies from? Are they from a K1/K2 bike as they look easier to space than the newer versions? Is any spacing needed? If so how is it achieved?

2) What is the outside diameter of either end of each body? (For choosing air filters and large silicone hose)

3) What inside diameter and length of small silicone hose did you use? (to the brake servo unit)

4) Could you please upload a photo/drawing of how your throttle cable arrangement works? Is it using the standard cable?

5) What is the 4th T piece and black hose for in the later pictures of your ITB setup which isn't in the earlier pics?

I know it's all very specific and nosey but these details will allow me to order parts online and possibly get it set up and tested before it has to get SORNed. I will be sharing videos and test data with everybody when it's done :grin: .
 
I can't remember most of the specifics off the top if my head but I'll go round with the tape measure tonight and get you all the details.

However for point;

1) the throttle bodies are from a K2 bike, there was slight spacing out needed in order to match the Puma inlet. The throttle bodies are held together with 3 lengths of threaded bar that run throughout the throttle bodies, you just need to buy a length of 5mm threaded bar (1m was enough I think,B&Q about £4) and some 5mm id washers to replace the original bar and space to suit using the washers. Some M5 nuts are also needed as the originals are integral to the threaded bar.

5) The 4th T piece is to provide vacuum to the fuel pressure regulator. However regarding the vacuum we were having mixed results by tapping in to all four throttle bodies to take vacuum and we are going to try just taking vacuum from just one throttle body to see if that helps.

I'll get you answers to points 2, 3 and 4 by the end of the day. Hope this helps.
 
Ok, the throttle bodies are 45mm on the engine side, 54mm on the intake side. The silicone hose is 4mm id and 1m length was enough. The throttle cable is the standard item, the bracket can be seen in the picture above, its basically a bit of aluminium angle bar with a hole filed to hold the puma cable. This will be remade in stainless steel for extra strength.
 
Fantastic replies - very helpful indeed! :eek:k:

Thanks to you I have now ordered/collected everything (providing an eBay seller sticks to their word) to make it work.

I'll take the Puma manifold in to uni to cut it and hopefully fabricate a throttle cable bracket whillst I'm at it.

Some items I will be waiting until mid next week for but that still gives me a few days to fit it and take it for a spin :grin:

Can't wait to hear it and be interesting to see whether it makes it faster or slower...
 
I'm probably a bit late to be asking this but...

under your large air filter do you still have the trumpets fitted that you had on in the first pics? Are these just modified versions of the ones from the bike's air box? Or are they completely your own creation?

I only ask as I'd like trumpets to reduce turbulence into the bodies but was unsure whether they'd leave enough room for filters. My throttle bodies are due to be dispatched tomorrow and I'm thinking I should ask for the standard rubber trumpets (if not already included) to be sent too.

Cheers for the heads up for driving with the standard ECU :eek:k: - I gathered it wouldn't be smooth and noticed it in your test drive video. Have you made any steps towards your megasquirt conversion? I'm hoping megasquirt will be my next purchase. Probably not for a few weeks though...
 
mikeandthat said:
I'm probably a bit late to be asking this but...

under your large air filter do you still have the trumpets fitted that you had on in the first pics? Are these just modified versions of the ones from the bike's air box? Or are they completely your own creation?

I only ask as I'd like trumpets to reduce turbulence into the bodies but was unsure whether they'd leave enough room for filters. My throttle bodies are due to be dispatched tomorrow and I'm thinking I should ask for the standard rubber trumpets (if not already included) to be sent too.

Cheers for the heads up for driving with the standard ECU :eek:k: - I gathered it wouldn't be smooth and noticed it in your test drive video. Have you made any steps towards your megasquirt conversion? I'm hoping megasquirt will be my next purchase. Probably not for a few weeks though...

Yes they are just the standard rubber trumpets from a GSXR air box. No ecu as of yet, but it is on the long list of expensive parts to buy. The jerkyness comes from the bike throttle body throttle quadrant having a linear response meaning it opens up too much at low revs compared to a car throttle quadrant. It can be eliminated through mapping but it would be better to replace the throttle quadrant but that's something we haven't looked at yet.
 
We got the wideband connected up last night so that we can see what is happening with the engine. We have long suspected the engine is running very rich due to the puffs of black smoke and smell of fuel from the car.

However, the wideband revealed something very interesting. At idle and constant revs the engine is running extremely lean (30 AFR). However during acceleration of the engine, the engine runs rich (10 AFR), which explains the black smoke when revving and also the backfires through the inlet when idling.

We have a few ideas to try and get the AFR in to the right range, but if that fails we will be looking at a stand alone ECU.

I will report back at the weekend after some tinkered, and hopefully some updated pics as a lot has changed recently.
 
Hi guys, here are the updates I promised.

First off the biggest change is that the interior is now white. As you can see on the picture we have fitted braided brake lines throughout which make for a very neat finish. You can see the brake line coming from the master cylinder in the engine bay, to the bias valve and off to the rear beam where it meets a t piece to go off to the rear callipers.

393414_10150399455692472_525307471_8471744_257426832_n.jpg


The line has been fixed in place using rubber lined P clips which keeps everything nicely in place.

Next up we have lightweight aluminium door cards, we also have alumimium panels in the rear to blank off the cavities. These tidyed the interior up no end and look much better than having the internals of the doors on show.

376144_10150399457212472_525307471_8471752_2033448722_n.jpg


From the rear you can see that there are now boot springs and mudflaps. The huge size of the mudflaps is to comply with the MSA rallying regulations.

387502_10150399459472472_525307471_8471760_1242638840_n.jpg


If we take a look under the car from the back you can see the braided brake lines running along the rear beam, which we have painted to add some rust protection. It looks like the fuel tank needs this treatment next!

385198_10150399460487472_525307471_8471763_223029349_n.jpg


In the cabin all excess wiring has been removed, leaving just the bare essentials for the car to function. We have a black sack full of wiring and connectors that came out of the car, who knew you could remove so much.

378559_10150399453522472_525307471_8471736_1157079533_n.jpg


We are also in the middle of rewiring and rerouting the wideband lambda sensor to make it more neat and tidy, you can just see the lambda connector sticking up through the floor infront of the gear stick.

Up at the front you can see the mudflaps also on the front wheels, along with the new tyres fitted to the new wheels.

379814_10150399461107472_525307471_8471766_1765550614_n.jpg

391127_10150399461932472_525307471_8471769_1929695803_n.jpg


We are hoping to have bought the cage within a month of the new year but for now we are keeping busy making the car look as tidy and professional as possible. The dash will be going back in once we have finished with the wiring and brake lines. The plan is to have the car ready for competition somewhere near the end of next year, I hope you enjoy the pictures.
 
Have you got anymore pictures of the wideband setup i.e. the sensor/boss location on the exhaust, cabling going through the floor etc. I have had one sat in a box for a while and want it fitting but thought I'd have to go via the engine bay wiring loom to get it into the car. The way you have it is a much better and more direct route ;)

Although my sensor cable may be too bloody long as I chose a 10ft one because of the route I 'thought' was needed...doh!!
 
Did you not fancy keeping all the piping internal and going through the arch side panels with the hoses

also that braided hose looks pretty taught with the suspension compressed surely if the suspension unloads going over a hump or something thats going to snap :?
 
For some reason the photo doesnt show the amout of 'play' in the bit of braided hose, it was installed with the suspension at full travel plus a little bit for safety, the gromet also helps as it has some give if need be but still seals well. Originally we did have the pipes running out of the arch but with the change of plans to use it as a rally car we felt they would be a little exposed, this is a set up that is commonly used to protect brake lines on such cars. Eventually there will be some flexable guarding that will run from the underside of the car onto the rear beam to offer further protection.

I will leave it to gary to put up some pics of the wideband setup and explain it a bit more, its not quite finished as even our quite short cable is way too long so that will need shortening and we need to fit a gromet in the floor where it comes through.
 
As Phil has said, there is quite a radius on the hose to the ream beam to allow for expansion when the rear unloads, but the angle of the photo hasn't picked it up at all.

We had quite a period of deliberation about the brake lines, and after seeing and examining closely many examples of top end rally cards using fully braided we thought we would go for it. Obviously it is more expensive than copper lines but we felt the extra protection and more professional fit were worth it, and on a car that is having this much work done to it an extra £100 here and there doesn't even hit the radar.

I'll get some more detailed pics of the wideband set up for you as soon as I can, we are currently in the middle of resoldering the connections with our new soldering iron as the previous one just didn't cut the mustard.
 
Back
Top