Another thread about arches

ProjectPuma

Help Support ProjectPuma:

This site may earn a commission from merchant affiliate links, including eBay, Amazon, and others.

huw_jenks

New member
Joined
Feb 27, 2016
Messages
56
Hi people, this forum is so good that I've not had to ask any questions so far, just been using the FAQ's, How To Guides and such. But now I need some judgements on the rear arches of my Puma. Here's a photo.


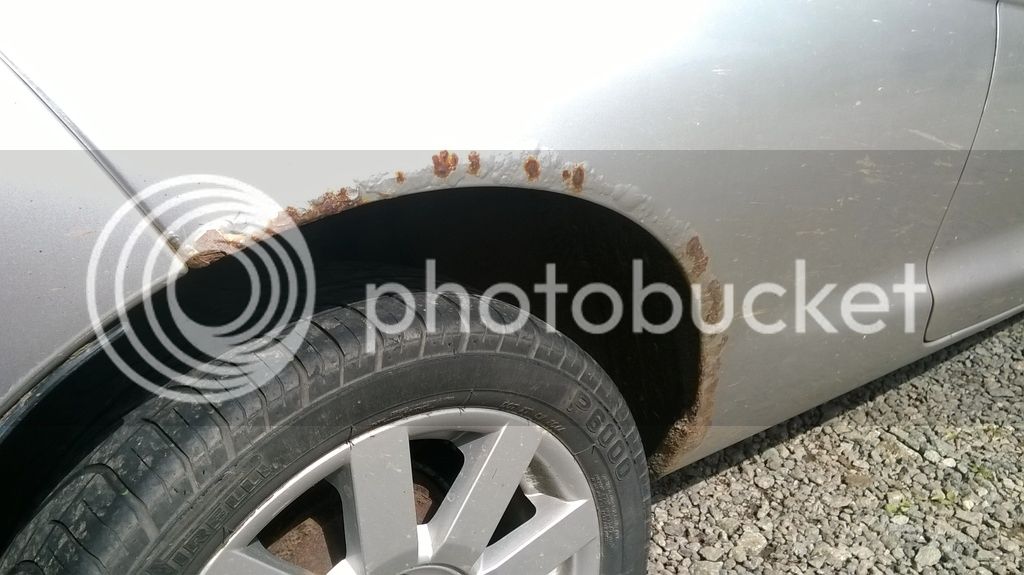
So I realise that the right thing to do here is cut out the rust and replace with a fabricated bit of steel, a replacement panel or a 206 front arch but I'm not quite ready for doing that yet. Mainly because of money, but I will definitely be doing at some point! So instead I was thinking, grind out the rust with an angle grinder to start, then fibreglass, filler and paint, as a temporary job before getting it done properly in the future. What I would like is some people who have done this temporary fix to give me their opinion on how long the repair will last, problems there might be, how to make it long lasting and how to get the best finish.

Thankyou, any advice is much appreciated.

PS, I've only shown the O/S as the N/S is not even half as bad.
 
I have done the fibreglass route and I was surprised at how long it lasted. Mine were worse and had been repaired by a previous owner so I was missing a helluva lot of metal!

First thing to appreciate is that this isn't a quick job and it's also a very messy one. The dust is really bad for you so ensure you at the very least have a few disposable masks to help reduce how much you inhale. I would say, assuming you are doing this in evenings, that your car could well be off the road for 4-5 days.

Second thing is if you're going to do as good a job as possible you may well be looking at painting the whole quarter. It will probably end up as quite a big repair as you try to blend the filler out across the panel, to ensure you can't see a "step". I have managed this with mostly hand tools and rattle cans to paint. Up close the paint finsh wasn't brilliant but generally speaking it wasn't bad.

If you want I can write you a splurge on what I did. I think I have some photos of it as I went along as well. If you're hoping to do something more conservative someone else might have a quicker method.

P.s once you start poking with a screwdriver it might get worse quickly!

P.p.s regardless of what route you do decide to go down it would help slow down the development of further rust if you took out the rear door cards and treated the inside of the arch seam - there's a few threads about doing this already. It'll also help prolong the life of the repair.
 
id like to know how you did it as well, mine also needs sorting on a temp bases before i get it done with new metal
 
I did a quick 'repair' once and after a year it was again completely rusted. After not even 2 years it was worse then before the repair. Need to add, it's a long time ago and I didn't properly protect the inside with wax back then. Probably if you do that well it might hold some longer, but even then..... Painting by a professional is allways the largest cost so for a quick repair I'd just spray it with a can temporarily (it's your choice but I wouldn't take the risk of such an amount of money for the paintjob, knowing it could be back one year later)
 
For a very quick fix that's not exactly pretty but a sight nicer looking than rust on my red runabout I just knocked all the loose rust off and flatted the rest with some 150 grit iron oxide paper, coated the rust with rust killer and then painted over it with Finnigans smooth red paint, you could do the same with silver smoothrite . Its only just started bubbling through on mine after 7 months.

All the effort of body filler for a temp fix is really wasted time, when you can concentrate on a proper job cut all the rust out and weld new metal in and then waxoyl behind it when done.
 
Well I've finally got around to doing something about it! Thanks for the replies by the way, I did read them at the time and I'm replying now becuase I've actually started to have a go. ArtfulHussy was quite correct that when I started poking around things got a lot worse.

I started off with the angle grinder taking off everything that was bubbling. Soon I was left with a thin strip of solid metal at the very bottom of the arch, connected to the rest of the body by a patch about an inch wide! So I grinded (ground?) away as much crap off the strip as I could and used that to give some shape to the filler.


I covered everything with Hammerite Krust (which I honestly don't think has made any difference to any jobs I've done in the past) then got ready for filling.

I spread around plenty of P40 to make everything nice and solid then sanded, then knocked out a couple of bits and refilled them where I thought it was too thin. Then lots more sanding.


Then a few layers of P38 and more sanding.


Tomorrow's going to involve more sanding and some primer!
 
Wow - a braver man than me, Huw. As someone who is only just trained in the use of a potato peeler, rebuilding arches is a bit out of my league, so good luck.

I had mine redone at a bodyshop - not cheap, but they did a great job and rebuilt the rear arches by hand. Once they'd taken the old rotten ones off (what was left of them, anyway) they showed me the design flaw. Water collects in the folded seam where the inner and outer arches meet, and generally sits there (helped by the wheel-arch protector) eating away at the metal. Once they had rebuilt mine they properly sealed that metal fold, then recoated the whole area with rust-proofing. Expensive, but worth it.

Rust. :evil:
 
looking promising so far, I basically did the same with mine (pics will be on here somewhere) lasted about a year but was quite pleased with the finish I managed to get with rattle cans, virtually invisible when done and as the yellow is a solid colour so much easier to match than the metalic ones.
Look forward to the finished job
 
Despite my previous comments I have to say you've done a good job there.

Also nice to hear from zinc2000 that the Millie yellow is a good spray can match as I'm intending to do a quick tidy up on my back arches for now.
 
the one I bought was a perfect match after several thin coats and a little t-cut and polish, will let you know where i got it from if I can dredge it up from the old memory banks
 
I have been looking into learning leading to sort out mine but if they turn out to be as bad as that one I may have to think again lol. Looking good there though :)
 
redexr....tried to copy/paste the link for car paint but not working (its probably just me!)

So....company is called CarPaintRepair.....carpaintrepair.co.uk should get you there
Phone number is 01501 742749 hope that helps
 
Slow progress, but sanded down today with 120, 240 and 400 grit paper. Had to put another blob of P38 on as you can see, I'll sand that down tomorrow before the primer goes on.

 
Sometimes putting high build on with a roller helps. Just mix a bit with a splash of hardener and put a thick layer on. It acts almost like a thin filler and helps to fill in pin holes and take up the step in paint layers. Leave it to dry overnight, sand and prime over with aerosol as normal. It's also good for highlighting high/low spots on the repair.
 
huw_jenks said:
[post]352270[/post]

Great job so far, inspired by your efforts this is what I am going to do!
Now regarding this pic: would a bit of foam filler put in at this stage help and then the P40 etc...to make the repair last longer?
 
Like insulation foam? Its not something I would've considered myself but I can't think of a reason why not. I would still be filling over with fibreglass as I would thing foam is too flexible to take cataloy, which I think would crack when dry.


And this is what it looks like after painting! Not a perfect job, far from it. I was rushing ab bit because I wanted to use the car over the bank holiday weekend and didn't want to go out with just primer on it. I'm going to leave it another week before cutting it in and put up another photo, hopefully looking a lot more shiny!
 
Great job that, always good to cover up thw rot as it really lets the cars down eh? Paint hardens after 24-48 hours (depending on if you've baked it). If you don't polish it before then you're stuck with whatever orange peel / dry spray / runs etc you may have.
 
Back
Top