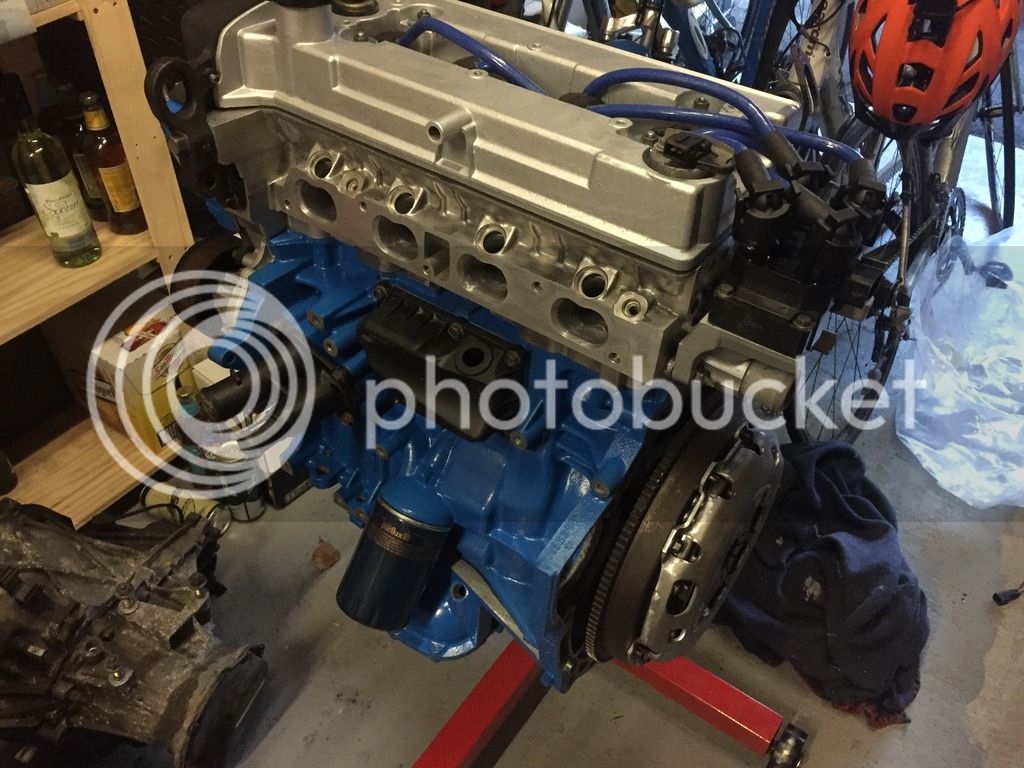
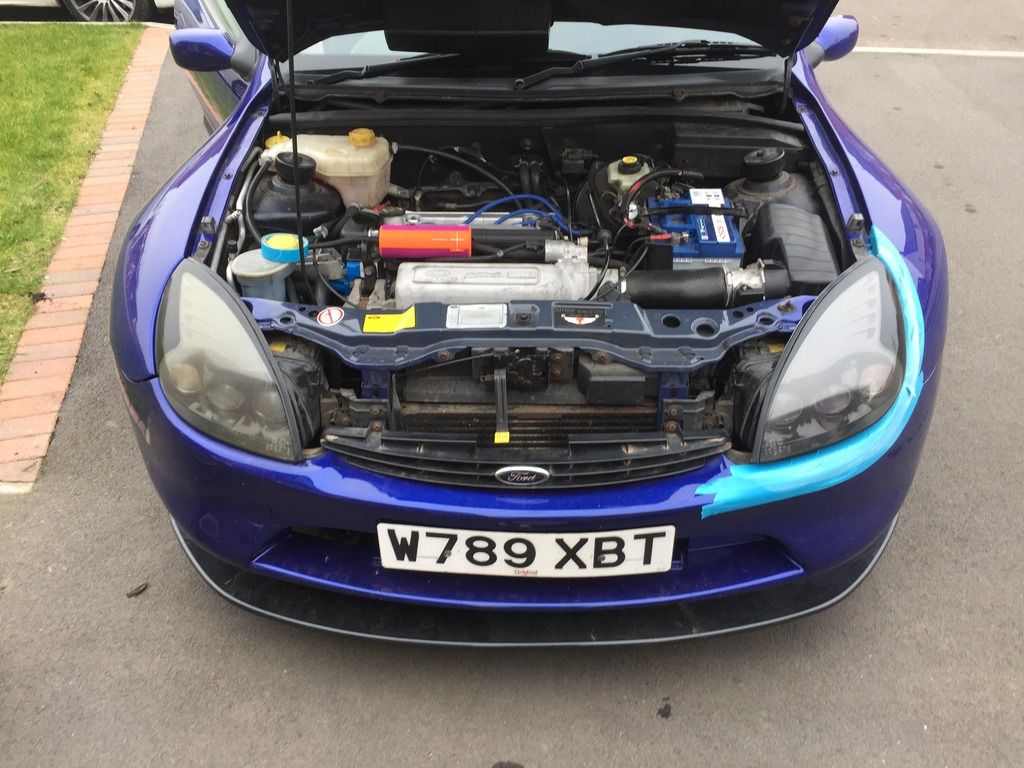
The rebuild of no 219

ProjectPuma

Help Support ProjectPuma:

This site may earn a commission from merchant affiliate links, including eBay, Amazon, and others.
richard_rip said:
[post]360768[/post] Fully rebuilt and ready to go back in the car, the only "issue" I have is with the ignition leads. The length of some on the leads isn't quite right and they don't sit very neatly, I've tidied it up since taking this pic but it still isn't as good as it could be. I've used Magnecor leads on two previous cars and they've been great so thought I'd use them on the FRP.
C21E4D72-6137-45DB-B715-97DAC83D5714_zpsfpsfsrfp.jpg

76C2E71F-5EF0-415A-9673-6C79915911F2_zpspsib6yg9.jpg

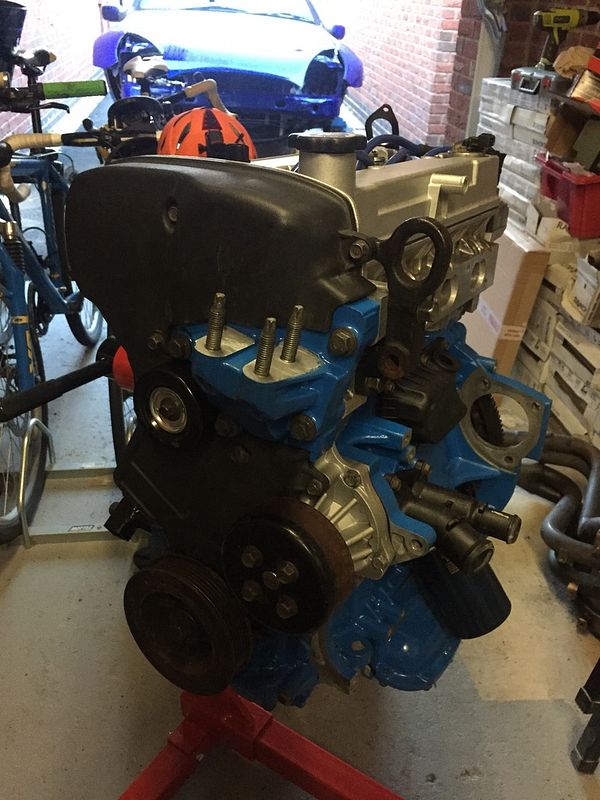
Obviously, your engine is stll short of starter and inlet but well done! Clap-clap-clap!
 
It's been a busy couple of week regarding all things FRP
The engine is back in, at this point I only connected things that were necessary to fir the old girl up
62365D6C-748B-485E-981D-49D9A7285D9D_zpsdyzlfmff.jpg


just after I'd turned it over. The only problem I had was like an idiot I got the fuel feed and return lines the wrong way round on the fuel rail, apart from that it was great. The smoke is just stuff burning off the manifold btw :grin:
[youtube]https://www.youtube.com/watch?v=DOQ_ZzGBhD0[/youtube]
 
After I got the whole car back together I took it for an MOT, which it failed, FML.
It failed on lack of water coming through the washer jets, I found the filter blocked.
Exhaust leak (replaced the rear gasket)
ABS sensor was hanging incorrectly (my bad)
A corroded front brake line which I got the garage to replace.

It's now all legal and taxed.
Onto more run of the mill stuff, the fuel gauge wasn't working properly so I wanted to switch the old sender unit out. When I got the tank out I noticed it was getting a bit rusty so I thought I'd clean it up and repaint the tank.
2FE056C4-154F-4A34-87A9-AA53F14CD31F_zpsgjgslur9.jpg

After a LOT of scrubbing with wire brush and a dremel, and a bit of spray paint
AA3EBAC0-BB86-45AC-AE25-7458DC77CE6C_zpsz22mdcwt.jpg

CEE1F6DD-409B-406C-92EB-C2757B93C0FF_zpsfj0fbzx6.jpg


I also picked up a Turtlewax headlight restoration kit, I'm hoping it's obvious which side I did first
8ADC80A5-F36B-474A-B031-4945BD323C20_zpsabsuivo6.jpg
 
Oh and I've also started getting the paint work back up to scratch so my DA made an appearance this weekend. The roof was the worse panel on the car and had a lot of swirling on it, not to mention a bit of white overspray and the usual sap/tar contaminants. Not a great pic I know, but the best I could do in the light
cb9550af-8640-4e73-8123-adbf0eaaf6ac_zpsxrfb6dra.jpg
 
Impressive work, good to see another FRP getting in great shape. About the fuel tank, it's amazing how fast the rust gets through again if it's not done properly. I did mine with only a rust neutralizer and paint and after some months the rust got through again. There is a member here who has done his tank with acid etch primer and some sort of 3M coat. I think that is the best way to protect it.
Great work on the engine btw :grin:
 
TylerB said:
[post]361130[/post] Impressive work, good to see another FRP getting in great shape. About the fuel tank, it's amazing how fast the rust gets through again if it's not done properly. I did mine with only a rust neutralizer and paint and after some months the rust got through again. There is a member here who has done his tank with acid etch primer and some sort of 3M coat. I think that is the best way to protect it.
Great work on the engine btw :grin:
I can imagine, the problem with doing these things in your garage is that the paint just doesn't set as hard as in a bodyshop with them being air drying. At some point the whole back end will be coming apart so I can get the trailing arm blasted and powder coated, and I'll be painting underneath the car with Epoxy 121 (the rear sub frame chassis mounts are just starting to show some corrosion). I'll look at doing the tank in the same stuff then, apparently its a fantastic product and sets really hard with it being a 2 pack.
 
It struggled to start this morning, and then when it did start it sounded like it was misfiring but a foot full of throttle seemed to cure that though. Second time its done that hmmmm
 
Has it been warmed up properly on previous start? It is known, if you just start it up to repark it (for instance) and it doesn't warm up properly, PCM somehow 'thinks' it is warmed and doesn't adjust the fuelling as it should and it starts difficuilt and coughs etc....
Also, it will need a bit of cranking up if it was stopped at say 25C and in the morning the temperature dropped to say -2C or something and it will need some time until it measures the inlet temperature correctly. Perhaps worth checking the inlet air temperature sensor? MAF is OK?
 
Wild E. Coyote said:
[post]361150[/post] Has it been warmed up properly on previous start? It is known, if you just start it up to repark it (for instance) and it doesn't warm up properly, PCM somehow 'thinks' it is warmed and doesn't adjust the fuelling as it should and it starts difficuilt and coughs etc....
Also, it will need a bit of cranking up if it was stopped at say 25C and in the morning the temperature dropped to say -2C or something and it will need some time until it measures the inlet temperature correctly. Perhaps worth checking the inlet air temperature sensor? MAF is OK?

Think I've found the problem, the air temp sensor plug had popped off. I'll see how that goes tomorrow
Thanks for the input :)
 
richard_rip said:
[post]361154[/post]
Wild E. Coyote said:
[post]361150[/post] Has it been warmed up properly on previous start? It is known, if you just start it up to repark it (for instance) and it doesn't warm up properly, PCM somehow 'thinks' it is warmed and doesn't adjust the fuelling as it should and it starts difficuilt and coughs etc....
Also, it will need a bit of cranking up if it was stopped at say 25C and in the morning the temperature dropped to say -2C or something and it will need some time until it measures the inlet temperature correctly. Perhaps worth checking the inlet air temperature sensor? MAF is OK?

Think I've found the problem, the air temp sensor plug had popped off. I'll see how that goes tomorrow
Thanks for the input :)

Well, have you solved the problem? Engine running ok now?
 
Wild E. Coyote said:
[post]361244[/post]
richard_rip said:
[post]361154[/post]
Wild E. Coyote said:
[post]361150[/post] Has it been warmed up properly on previous start? It is known, if you just start it up to repark it (for instance) and it doesn't warm up properly, PCM somehow 'thinks' it is warmed and doesn't adjust the fuelling as it should and it starts difficuilt and coughs etc....
Also, it will need a bit of cranking up if it was stopped at say 25C and in the morning the temperature dropped to say -2C or something and it will need some time until it measures the inlet temperature correctly. Perhaps worth checking the inlet air temperature sensor? MAF is OK?

Think I've found the problem, the air temp sensor plug had popped off. I'll see how that goes tomorrow
Thanks for the input :)

Well, have you solved the problem? Engine running ok now?
Erm, sort of, one problem was fixed and another one has popped up. It was running lovely until last night when all of a sudden it started running really badly and kicking out white smoke. I managed to nurse it home and noticed the coolant was a little so I checked the oil and found some water in the oil. I've had the head off this afternoon and found drops of coolant around the cams and some in the cylinders, like the head gasket is leaking. When I turn the crank by hand its really smooth and nice, the bores look good theres no damage to the pistons. Timing was all good when I took the head off. I can only think that it's the gasket, or the head bolts?? I've doubled checked the torque setting I used which it seems to be
 
tuonokid said:
[post]361247[/post] Hi Richard
Did you use new head bolts as they are stretch bolts and should not be re-used?
Barry
I did, purchased a set from Burton Power. When I rebuilt the head on my 197 I found out about these stretch bolts :grin:
 
What torques did you use? Ford says it is 3 stage affair: 15 Nm, 30 Nm and additionally 90 degrees. Also, did you torque them up according to the prescribed sequence?

 
Yeah definitely. And just to be sure I did the 15nm and 30nm twice to makes sure they were all torqued correctly before the 90 degrees was applied

Wild E. Coyote said:
[post]361257[/post] What torques did you use? Ford says it is 3 stage affair: 15 Nm, 30 Nm and additionally 90 degrees. Also, did you torque them up according to the prescribed sequence?

 
Wild E. Coyote said:
[post]361271[/post] Have you taken the head off? I seem to remember you haven't machined either block or head prior to reassembly?
I have, there was coolant between the mating faces. I haven't machined either of them, I 3D probed the head and it was within 0.03mm flatness. But I think I'm going to take them both into work and machine them so they're perfect, they both have a depression rings around the cylinder so it will get rid of that as well :grin:
 
richard_rip said:
[post]360512[/post]
XAF said:
[post]360510[/post] Looking good! I think it may have been me that shared Sinisa's info on the big ends - he did all the hard work I can't take any of the credit!

The gauge reading the wrong way means it's the wrong sender in afraid, it'll work fine, just read incorrectly.
A big thanks for sharing :)
They worked a treat and the clearances are spot on now

Out of interest, as I am diong the same, what was the radial gap and how did you measure it? What colours were the original bearings in the engine?
 
Wild E. Coyote said:
[post]361491[/post]
richard_rip said:
[post]360512[/post]
XAF said:
[post]360510[/post] Looking good! I think it may have been me that shared Sinisa's info on the big ends - he did all the hard work I can't take any of the credit!

The gauge reading the wrong way means it's the wrong sender in afraid, it'll work fine, just read incorrectly.

I've got a Ford workshop manual for the car and it had the bearing clearance values in there, if memory serves me right it was 0.04mm but I'll check. I used plastigauge to measure it
A big thanks for sharing :)
They worked a treat and the clearances are spot on now

Out of interest, as I am diong the same, what was the radial gap and how did you measure it? What colours were the original bearings in the engine?
 

Latest posts

Back
Top