....hmmm... well I thought I was getting the Pagid ones... I mean the listing was for Pagid, and I paid for Pagid but I got...
 001
001 by
G Whizz, on Flickr
Not best pleased... got on to the seller asking why and how come only one when two ordered at same time? They simply said send it back... so replied that means more days with the vehicle off road and doesn't explain why it not Pagid or why only one? Different customer service person replied "We only have Pagid, so we will just do a refund." ....???! Eh? If you only did Pagid we wouldn't be having this conversation mush... and does that mean I still need to return for a refund because if it does I still have to source a new part and so am still off road for days longer?! :evil:
Getting rather fed up of the delays, I've fitted the brake hose anyway... so after getting all that off my chest (deep breaths, whale song in background, stroke earlobes, say "hoozaaah".... ah, that's better)... I'll fill in how to do it for those who haven't tried... like most of these things, it's quite simple... if you know how, which I didn't, not having done it before :grin:
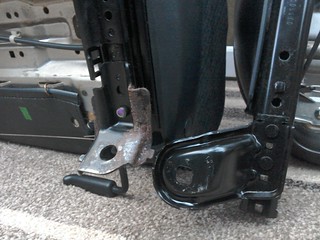
So, seemingly simply, the bottom end (red arrow in photo immediately below) that goes into the calliper (it's an 11mm open end spanner needed to tighten it up) and in the middle (blue arrow) there's a bracket attaching to the strut that needs a 15mm spanner or socket for the nut...
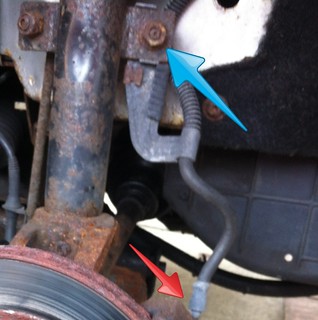 002
002 by
G Whizz, on Flickr
It's at the top that things get a little more interesting but it's still very simple really, once you know how. The top is also held by a bracket but connects to a copper brake pipe as well.
Check out this photo:
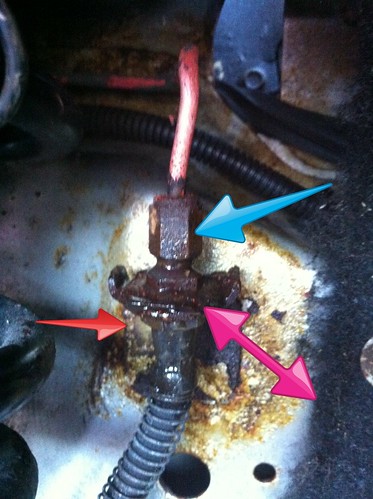 IMG_2495
 by
G Whizz, on Flickr
If you look at this part of the job for the first time there are two sections that can take a spanner, one on the copper brake pipe (the top blue arrow) and the other on the top end of the brake flexi hose (the bottom red) but it isn't immediately obvious which bit you put it on to slack off and release the brake hose. Indeed, given that the copper pipe is obviously not flexible, you might think it's got to be the hose you move... it's not.
First though, at the middle (double-headed) arrow is a locating clip, if things are rusty it isn't easy to spot, but it sits on top of the bracket and slots into a groove on the brake hose connection. I used a smallish flathead srewdriver to pull it out.
The fixing at the bottom of the copper brake pipe is a nut that will rotate... mine though was seized and was in danger of shearing the pipe if I started turning it, which of course really threw me as it seemed neither the bottom part (which is held by the bracket) nor the top part would move without something shearing. Being in something of a quandary, I texted my mechanic mate who explained that the top was seized and asked if I had a blow torch to warm it... I had nothing but my own natural hot air and some WD40 but thankfully the WD and a bit of gentle jiggling to and fro eventually did it, or I'd have been blowing on it still now :lol:
So, in a nutshell to change the hose you simply undo the nut on the strut bracket; remove the locating clip (double-headed arrow) then undo the bottom connector going into the calliper and then undo the top brake pipe connector. To fit the new one simply reverse. Should look a bit like this...
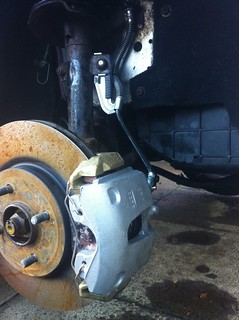 IMG_2496
 by
G Whizz, on Flickr
You'll need to wipe off any spilt brake fluid and then spray some brake cleaner over it as well to clean everything up. Don't forget to bleed the brakes after either... you can look that up online, it's how I did it and isn't Puma specific.
So, now I'm the proud owner of an ST170 300mm conversion... and a bit more Puma knowledge :wink:
I do have one question to throw out there guys, as I've just noticed it in the bottom photo: the end part of the flexi hose seems relatively taught, can it be fed through the bracket apperture and the wire protector or is it fixed to those bits?
 k:
k: